Your home’s fascia boards might not be something you think about often, but they play a key role in protecting your roof and maintaining your home’s structural integrity. Over time, weather exposure, moisture, and age can lead to damage, leaving you with the need for a fascia board replacement.
If you’re a homeowner looking to tackle this project or simply want to learn how it’s done, this guide is for you! Here’s what we’ll cover:
- What fascia boards are and why they’re essential
- A step-by-step guide to replacing fascia boards
- Professional vs. DIY fascia board replacement
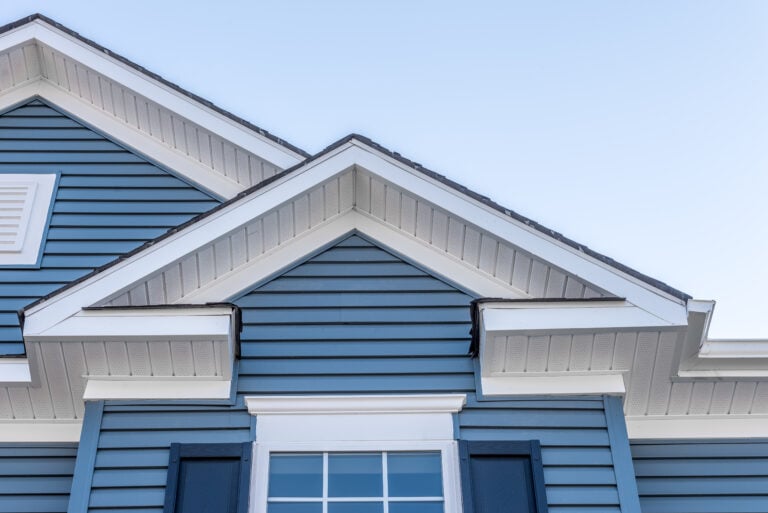
🤔 What Are Fascia Boards and Why Are They Important?

Fascia boards are the horizontal wooden or PVC boards that run along the edge of your roofline, supporting the lower edge of your roof and gutter system. They serve as a critical component of your roof’s structure, providing support for the last row of roof tiles and anchoring your gutters securely in place.
Beyond structural support, fascia boards also protect your home from weather damage by acting as a barrier between the elements and the interior of your roof. Additionally, they enhance your home’s appearance—clean, well-maintained fascia boards give your roofline a polished look and boost curb appeal.
Signs You Need a Fascia Board Replacement
It’s important to replace fascia boards before they fail completely to avoid further damage to your roof or home. Here are some signs to look out for:
- Rot or Mold: Discolored or soft wood indicates rot or mold growth caused by moisture.
- Cracks or Splits: Visible damage can weaken the board and its ability to hold your gutters in place.
- Peeling Paint: Not just a cosmetic issue; peeling paint can expose wood, leading to rot.
- Loose or Sagging Gutters: Damaged fascia boards can no longer hold gutters securely.
- Pests: Holes or gaps in fascia boards often invite unwanted critters into your home.
✅ 7 Steps to Replace Fascia Boards

Replacing fascia boards can seem daunting, but with the proper plan, it’s manageable for most homeowners. Follow these 7 steps to get the job done right:
1. Inspect and Measure
The first and most critical step is to thoroughly inspect the damaged fascia boards to understand the extent of the problem. This involves carefully examining the boards for visible signs of rot, cracks, peeling paint, or any structural damage. Pay close attention to areas that might have been exposed to excess moisture, as these are prone to deterioration over time. Perform a detailed assessment of the entire length of the fascia boards to ensure no issues are overlooked. Once you’ve identified the damaged sections, take out a tape measure and calculate the exact length of new boards you’ll need to replace them. Make sure to measure carefully, noting each length and writing it down for accuracy. It’s always a good idea to add a little extra to your measurements—this accounts for any errors or waste that might occur during installation, ensuring you have enough material to work with. Taking the time to inspect and measure properly will set the foundation for a smooth and effective replacement process.
2. Remove Gutters
Before replacing the fascia board, you’ll need to remove the gutters attached to it. Begin by using a sturdy ladder that can safely support your weight and position it securely, making sure it’s on level ground to avoid accidents. Slowly climb up to the area where the gutters are attached. Use a screwdriver or a drill to loosen and remove the screws or fasteners holding the gutters to the fascia. If the gutters are connected with brackets, carefully unhook them one by one. Be sure to work systematically along the length of the gutters to avoid placing too much stress on any one point, which could cause bending or damage. Once detached, gently lower the gutters to the ground or place them in a safe location where they won’t be scratched or bent. Taking special care during this step ensures the gutters remain in good condition for reinstallation later. It’s also an excellent time to clean out the gutters if they’re clogged with debris, so they’re ready to function properly once reinstalled.
3. Remove the Old Fascia Board
With the gutters safely set aside, you can now focus on removing the old fascia board. This step requires a bit of care and patience to avoid damaging the surrounding structures, such as the soffit or roofline. Start by using a pry bar or claw hammer to gently loosen the board at one end. Insert the tool between the fascia board and the supporting structure and apply steady pressure to pry it away. Gradually work your way along the length of the board, carefully detaching it piece by piece. Be cautious of nails or screws that may still be embedded in the board, as these can be sharp and pose a safety hazard. Use a hammer or pliers to remove any leftover nails to prepare the area for the new board. If the fascia board is particularly stubborn or damaged, you may need to use a handsaw to cut it into smaller sections for easier removal. Take your time during this process to ensure the soffit and roofline remain intact and undamaged.
4. Check for Damage Behind the Fascia
Once the old fascia board has been removed, take a close look at the underlying structure. Inspect the area behind the board for signs of rot, mold, or other potential issues, such as water damage or weakened wood. Pay special attention to the soffit and roofline, as these areas are critical to the overall structural integrity of your home. If you notice any damage, address it immediately before moving forward. For minor issues, you may be able to sand down affected areas, apply wood filler, or use a sealant to reinforce the structure. For more severe damage, such as rotted wood, you may need to replace the affected sections entirely. Properly addressing these underlying issues at this stage is essential for preventing long-term problems, such as leaks or structural instability. Taking the time to ensure a solid and secure base will ensure that the new fascia board installation is successful and long-lasting.
5. Cut and Prepare the New Fascia Board
With the inspection complete, it’s time to prepare the new fascia board. Begin by measuring the dimensions of the original board. Transfer these measurements to the replacement board, marking the cut lines carefully with a pencil or marker. Use a saw to cut the board to the appropriate length. For precise cuts, ensure your saw blade is sharp and measure twice before cutting to avoid mistakes. Once the replacement board is cut to size, it’s important to prepare it for the elements. Consider applying a weather-resistant paint, primer, or stain to the board’s surface to protect it from moisture, UV rays, and other environmental factors. This step will help extend the life of the new fascia board and keep it looking great for years to come. Allow the paint or stain to dry completely before proceeding to installation. If desired, you can also pre-drill holes in the board to make installation easier and more accurate.
6. Install the New Fascia Board
Now that the new fascia board is ready, it’s time to install it. Position the board against the roofline, ensuring it fits snugly and aligns properly with the rest of the structure. Begin securing the board at one end using galvanized screws or nails designed for outdoor use, as these are resistant to rust and corrosion. Use a level to check the alignment frequently as you work your way across the length of the board. This ensures a neat and professional finish. Tighten all screws or nails securely to hold the board firmly in place. If necessary, use clamps to keep the board steady while you work. Double-check the board’s alignment once it’s fully installed, making any final adjustments to ensure it sits flush against the roofline. A properly installed fascia board not only enhances the appearance of your home but also provides essential protection against the elements.
7. Reattach Gutters
With the new fascia board securely in place, the final step is to reattach the gutters. Carefully lift the gutters back into position and align them with the new board. Reinstall the brackets or fasteners that hold the gutters in place, using screws or a drill to secure them tightly. Work methodically along the length of the gutters to ensure they are evenly attached and properly aligned. Once installed, check that the gutters are positioned at the correct angle to allow for proper drainage. Test the system by pouring water into the gutters to ensure water flows smoothly toward the downspouts. If any adjustments are needed, make them now to ensure the gutters function effectively. Reattaching the gutters properly not only completes the project but also ensures your home is protected from water damage caused by improper drainage.
👨🔧 Should You DIY or Hire a Professional?

While DIY fascia board replacement can save money, it’s not without its challenges. Here are some considerations to help you decide:
Advantages of DIY
Taking the DIY route can be a cost-effective solution, especially if you already have the tools and experience needed for the job. It also allows you to have greater control over the materials you use and the final look of the finished product, giving you the freedom to customize it to your preferences.
When to Hire a Professional
In some cases, hiring a professional is the better option. For example, if there is extensive damage to your roof or soffit, expert repair is highly recommended to ensure the job is done correctly and safely. Additionally, if you lack the necessary tools or experience, attempting the repair yourself could lead to costly mistakes. Hiring a professional also provides a hassle-free experience and ensures a high-quality finish, saving you time and effort.
🏠 Fascia Board Replacement
In conclusion, fascia board replacement is an essential part of maintaining your home’s structural integrity, protecting it from damage, and enhancing its overall appearance. At Kornerstone Roofing, we combine years of expertise, high-quality materials, and exceptional customer service to ensure the job is done right the first time.
Whether you’re addressing damage or upgrading your home’s curb appeal, you can trust our team to deliver reliable, professional results every step of the way. Contact us today to schedule a consultation or request a free quote—let’s work together to give your home the care it deserves!